| My 1969 Autodynamics Deserter GS | | Home| My Webcam | Pictures of Me | Links | Contact Me | |
|
||

I had wanted a Deserter GS ever since I saw one in the flesh. I built a Manx clone from the ground up and really learned allot about Dune buggies. During the build, I picked up a NOS Weiand engine adapter kit from a guy in Dartmouth, MA. He had the coolest dune buggy I had ever seen. It was A GS and I spent allot of time looking at it and awe. I said to myself that I ever could find one, I would buy it. I contemplated making my own out of a Porsche 550 Spyder Replica frame.
|
My first Dune Buggy, A Corvair powered Manx clone |
Years later, it all started with this add. I found it while going a web search about corvair turbos.:
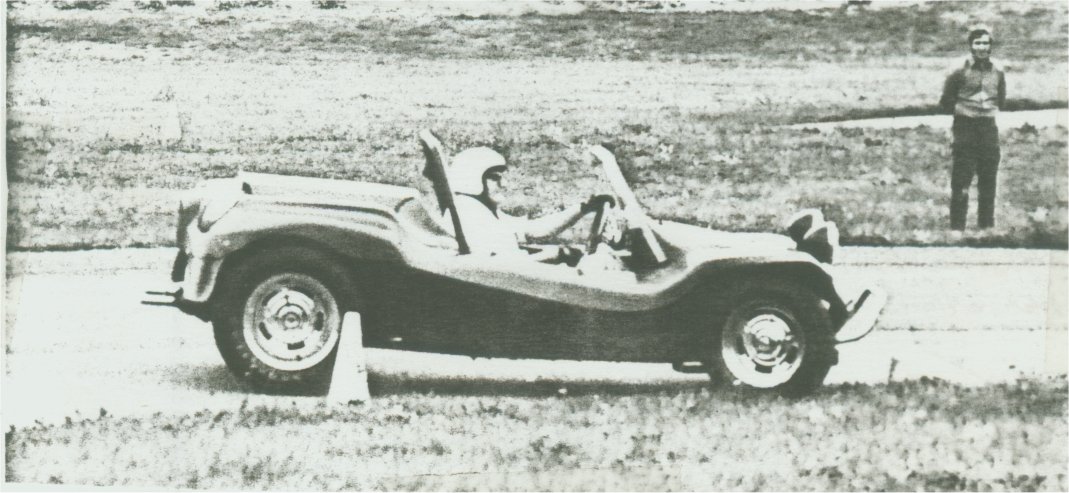
1969 Autodynamics Deserter GS. Tube frame, mid mount Corvair, VW transaxle kit car. 1100 lbs. Formula Ford weight with a mid mount six cylinder. A poor man's Boxster 30 years too soon! Typical dune buggy style body but very low.Absolutely original. Great fun autocross car or possible street usage. Has been on the street in the past. One family owned since new. Bought, but no time. Spare engine core. Call Ken evening or weekends.
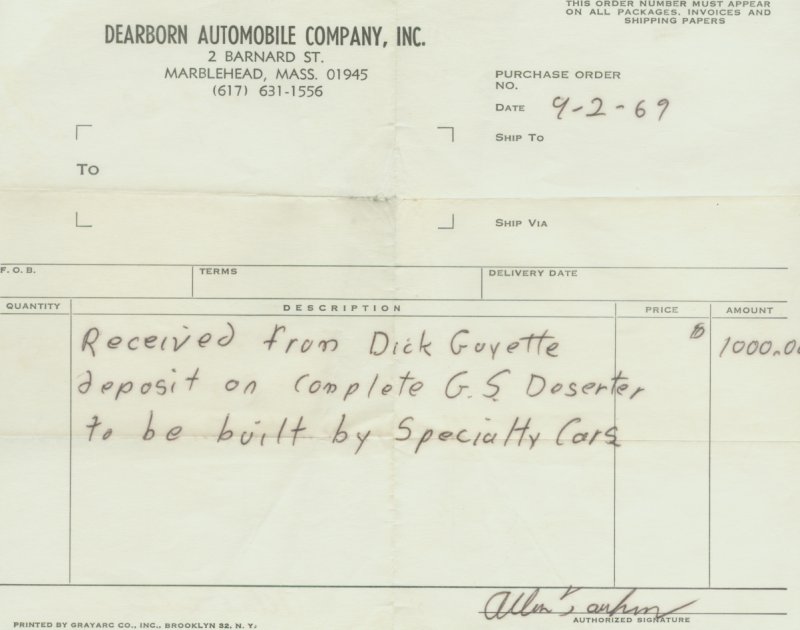
When I went to see this car, I was extremely pleased with the condition and we quickly worked out a deal. The one problem was Mass's rules on titles. That was going to be a minor pain to resolve.
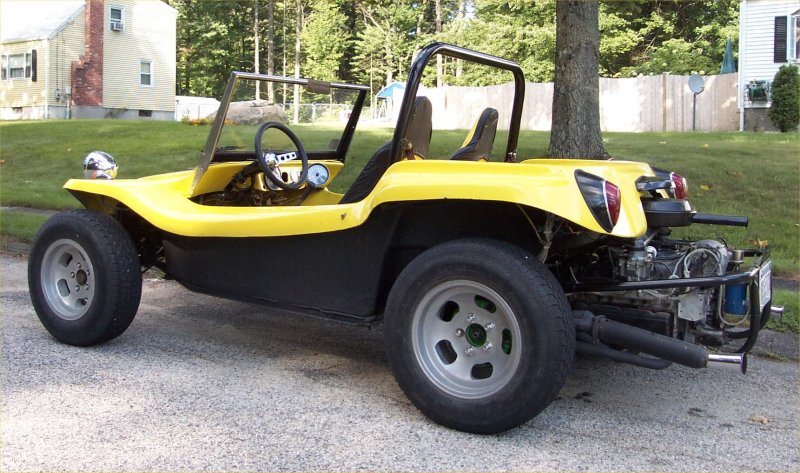
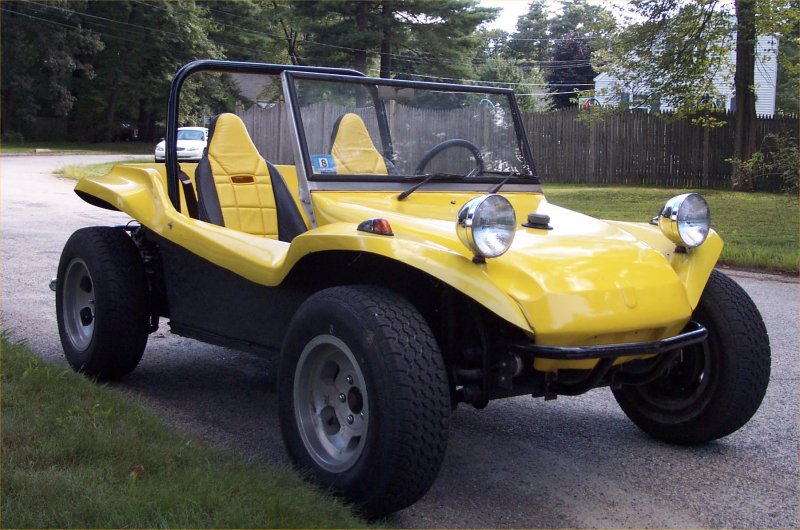
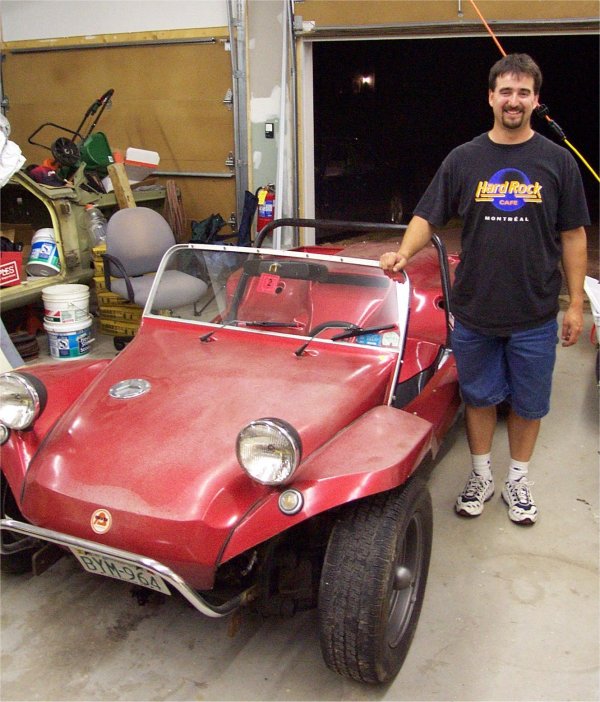
It was a 69 GS with SN 069010. 69 was the first year of production, so it's is a very early car. It only has 4k orig. miles but the gelcoat on the fiberglass is sun-faded, mainly on the hood and some of the fenders. It really needs only paint, and some work with the shift linkage and it's ready to go. The engine was a mid engine corvair engine that was rebuilt when the car was built. The previous owner was a big-wig in the local SCCA chaper and evidently traded it for a Formula Vee. He had a few Volvo projects going as well as on old chevy. It included a tow bar so I flat towed it home with my truck a few days later. I could hardly contain my exitement!
|
Chassis Diagram |
At home , I read all the paperwork that come with the car. My car is the series one model which uses the manx style body rather than the later bounty hunter body. Side by side with the manx, there are only subtle differences in the bodies, like the license plate area in the rear, and the slope of the rear quarters. The wheel base is 84" rather than the traditional dune buggy 80". The bodies have about the same length, but the body itself is much lower.
in the previous owners garage
I started making plans in my head right away: The first big issue was the linkage was so bad you really couldn't shift well enough to drive it. But I needed to wait for the title so it was ok. The PO said that the battery (it's new) tends to go flat after a few weeks, he suggested converting the alternator to a one wire style. I actually used a 2 wire setup, this gives the warning light. I got the Alternator from the Corvair Underground. But I was concerned that changing to an alternator may or may not fix the battery drain problem. There may be a very slight voltage draw from something. I figured any wiring simplification and loosing the external regulator would put me ahead of the game. I'd wanted to upgrade to discs but I need to retain the emergency brakes. I planned on front discs first, I could either buy the kit or use Karmann-Ghia parts, as they will fit right on the ball joint front end. I had allot of slop in the shifter, and I desperately needed to redo the linkage. That's the most important thing. It After a little research, it seems that the shift linkage seems to be a pain to every GS owner. I was put in touch with Chuck Riblett, from Black Hawk Engineering. When he lived in Denver his car was pretty well the FTD car at any local autox. He was a great source of information. The original shifter setup on the GS has these problems:
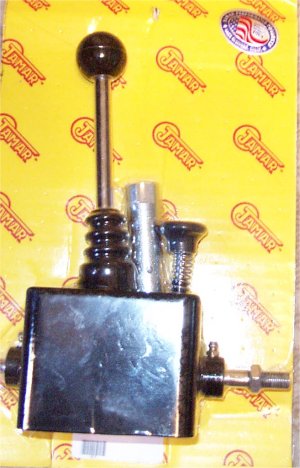
A cut down VW stock shifter...with a fancy walnut knob
I decided that I wanted to remove the stock setup, put it aside and go with something all new. I looked to the sand rail aftermarket for ideas. I did some research on off the shelf dune buggy shifter and found a few alternatives:
So, I decided to buy the jamar rod shifter set up and their super shifter and install that. I couldn't justify $500 for a cable shifter. Pluds I would remove all the stock parts and set them aside. I ordered the JS5 Jamar super shifter and JAMAR Polished Mid-Engined Shifter Kit.
I spent many hours aligning and realigning the linkage but the combination of the GS frame and the Corvair cylinder head meant I could not get the geometry to line up. Giving up on the rod shifter, I decided to sell the gas heater to buy a cable shifter. gas heaters are pretty collectible in the classic bug and Bus world. Mine was a Stuart-Warner, complete with the original instruction manual.
After the shifter was not resolved, I tried to make some other upgrade plans about engines, suspension, brakes and wheels and tires. Here were my Ideas:
I planed to rebuild my 62 turbo motor from my old manx and upgrade the turbo to a more modern design. I plan on selling the Stuart Warner Gas heater in the car and using the proceeds towards the shifter. The current 102 would serve me well as I learned the car and optimized what I had.
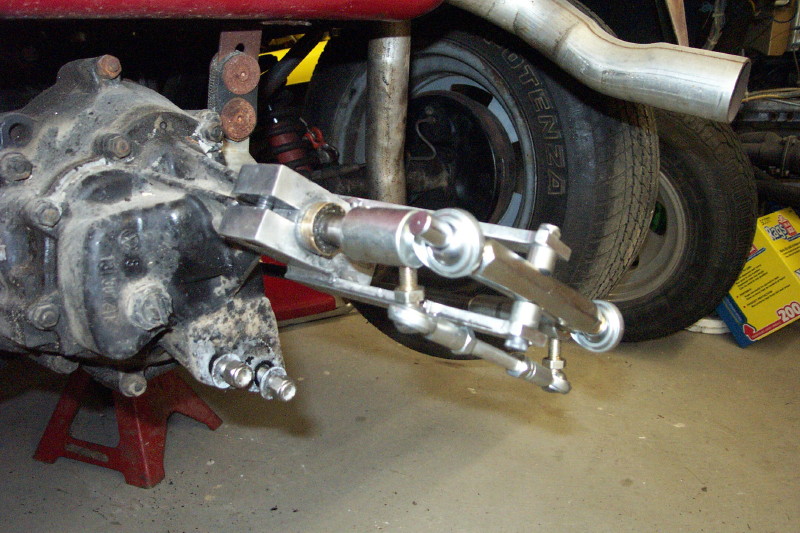
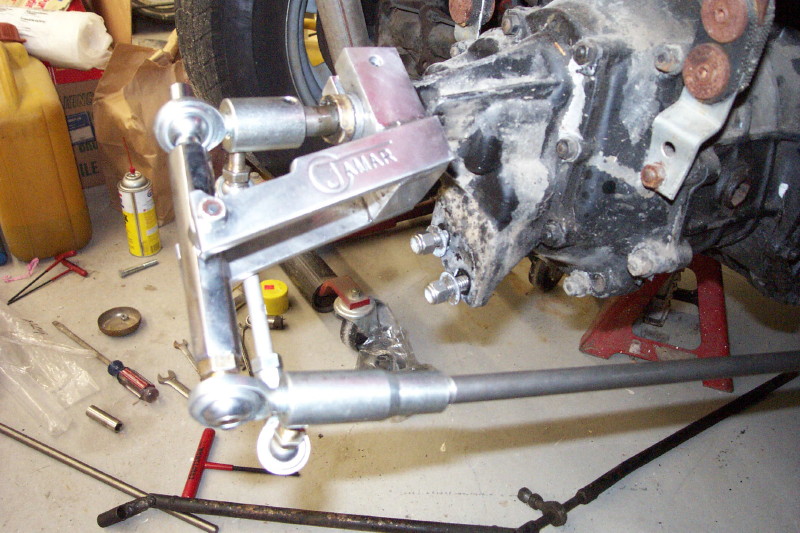
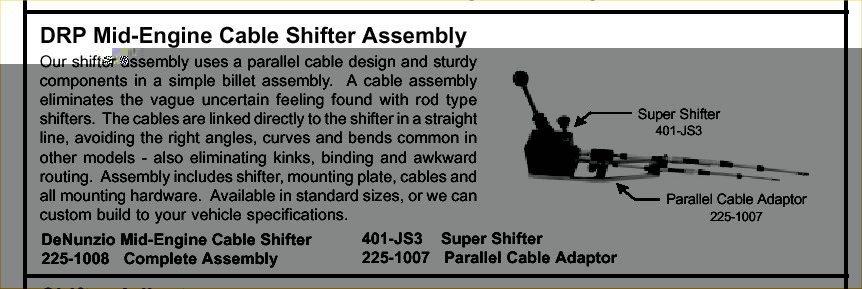
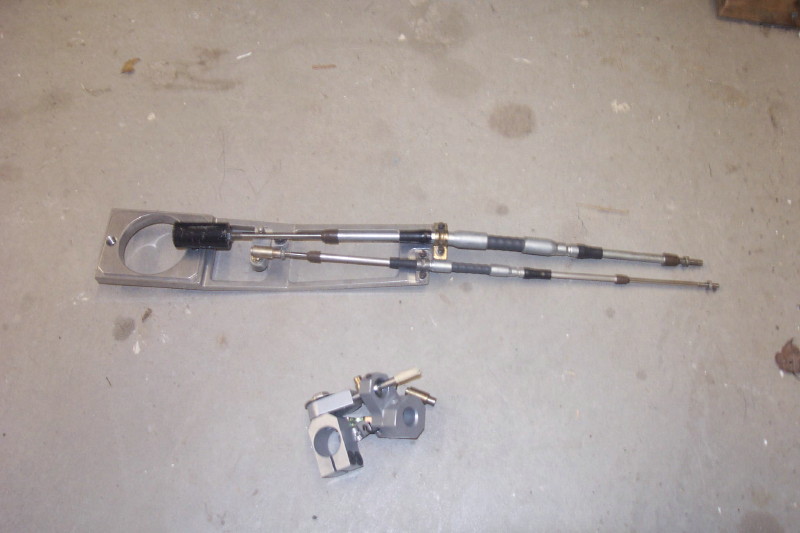
Since the Jamar Rod shifter didn't work, I gave up and ebayed it, keeping my Jamar super shifter and got the Denunzio cable shift set up from Herman Denunzio. The Denunzio setup normally comes with the Jamar super shifter so I didn't need to but it again.
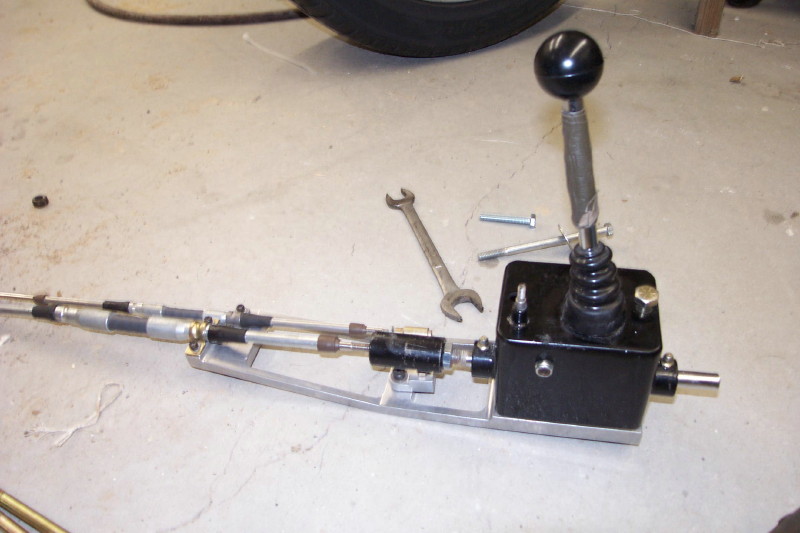
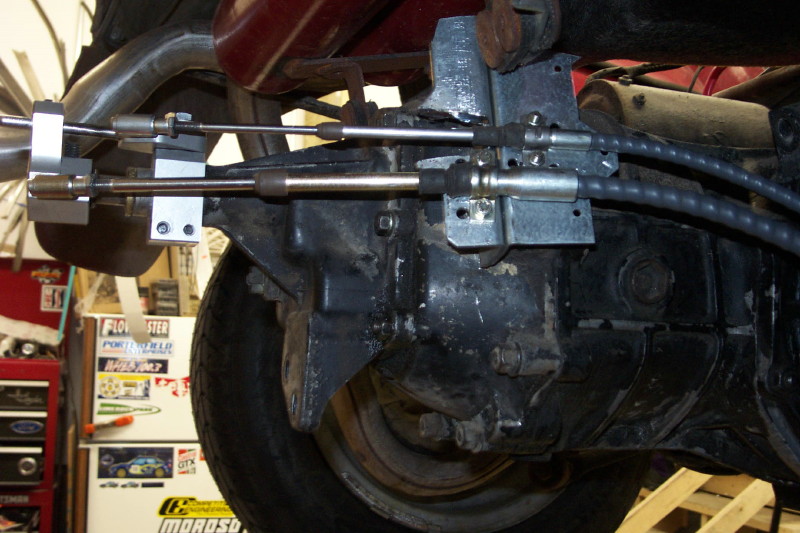
It was a long process to install the Denunzio racing cable shifter in my GS. I tried adapting a Jamar rod based mid engine shifter but I could not get the geometry right. There was too much bind in the U-joints to get the amount of atricualtion to select all the gears. I took about 4 months to actually receive the cable shifter, I ordered it from an operation that races off road buggies, and it was pretty much made to order. It's nice though, it uses a stock jamar shifter assembly (that I mounted under the floor) and custom machined aluminum pieces for the transaxle end. It has nice quality parts like aurora bearings. It is finished with sealed push-pull cables that are made to what ever length I specify. I had to make some cable mounts for the rear cable mounts but it's in now, and seems to select all the gears, but it kind of stiff. I hope with fresh gearlube and some use it will break in nicely. The only down side is the fact that the shift pattern is now reversed. First and third are back and second a fourth are forward. You actually get used to it pretty quickly.
I found Steve Hansen thru the spyder cub. He owned A GS when it was new and now owned a 550 spyder Clone. The 550 clones are very similar in design to the GS. I was looking for tech info everywhere on the web. I was lucky to find another GS owner. Steve Hansen told me about his deserter GS: "Lou, I had my Deserter built by Autodynamics in 1970. I was in the Army at FtBenning, GA at the time. I built it with a 110 Corvair engine. Shortly after I got it home I added 140 heads and an IECO center mount 4 barrel carb setup. Took the car to Germany in 1971 and rebuilt the engine while I was over there. Added a Crown cam, Weber 3 throat carbs, and IECO oversized pistons.In 1973 I got out of the Army and moved to Tampa, Fla. I kept the car in running condition while I was there.In 1976 I moved to Indiana. I pulled the Deserter behind me. I was there for a year. The car never moved. Then I moved to California. Flat towed the car out there. Again, it stayed parked for almost two years. To be frank, I was establishing myself in a civilian career and did not have time or money for the car. When I moved to New Mexico I again flat towed the Deserter behind me. I was in Albuquerque for seven years. I did pull the engine with every intention of rebuilding it. But by then I had really lost interest. The car was in pretty sad shape. By the time I moved to Arkansas it was hopeless. I did bring the car with me when I moved but took it completely apart shortly after arriving. By then, I was more interested in a 550 Spyder. When I built my Beck kit I used the steering box, front torsion bars, trailing arms, and brakes from the Deserter. I also used the rear brakes and transmission case. In storage I have the 140 heads, Weber carbs, IECO oversized pistons and rods, crank, VW to Corvair adapter, Otto Parts pan and pickup, and Otto Parts valve covers. If any of this tickles your fancy I am willing to deal. The rest of the car was cut up and junked. About the shifter. Mine had a couple of Craftsman 3/8" universals, the kind you use with a ratchet and sockets, in the linkage. Lots of slop. I could find all the gears but speed shifting was out of the question. The J-Mar rod based system in the Spyder is much better (but not as precise as it could be). As I recall, the Deserter shifter fit into a socket in the fiberglass floor/seats. It may be difficult to adapt a cable shifter. But then, that would be fun. The Deserter was a big hit in Germany. I had it up to 120 mph on the Autobahn. It was a bit scary. The front seemed to flex a lot at speed. I autocrossed a bit.
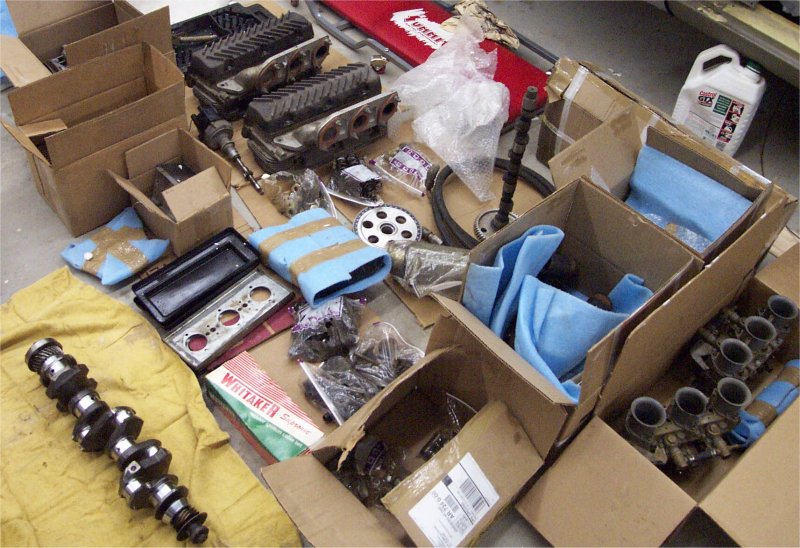
It was sad to hear about a rare GS being lost, but it was great that he had saved so many pieces. Since his car was long gone, we worked a deal where I bought all the parts he had left over.
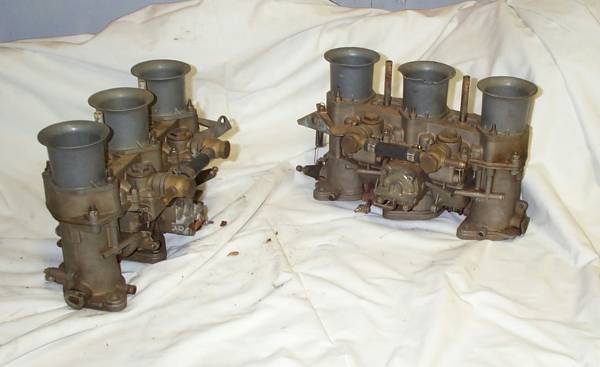
The Webers and cam really wake up the Corvair. I had so much power the clutch would not hold if I got to carried away. I do note that the Webers come up through the Deserter's rear deck. You will have to cut some fiberglass. If the car sits outside you will need to fabricate some kind of "blisters" to keep the rain out. Webers are very adjustable. They worked good with the big cam but I think you would be happy running something a little less lift and duration.
If I were doing it today I think I would run a remote cooler with a squirrel cage fan. Over the
transmission or in the back bulkhead. In any case, the shorter the hoses the better.
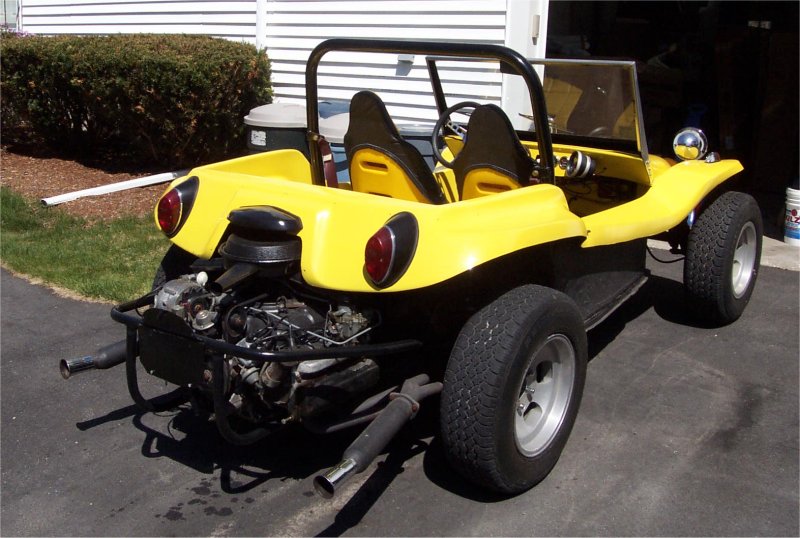
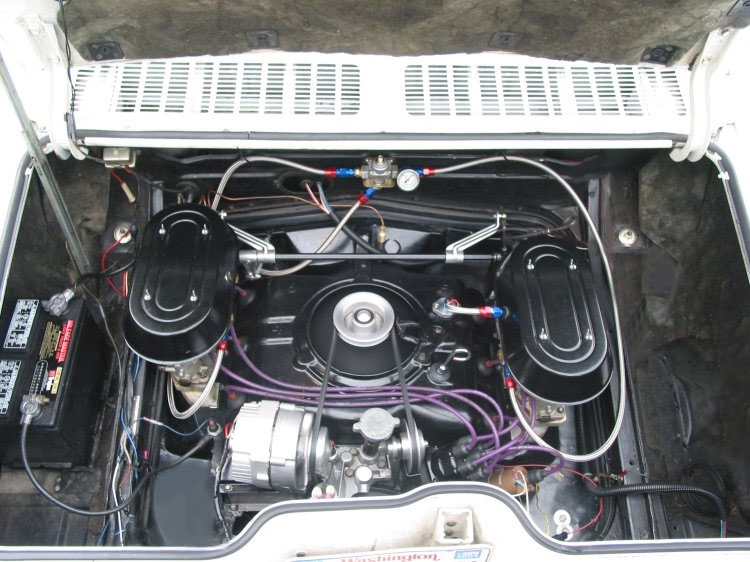
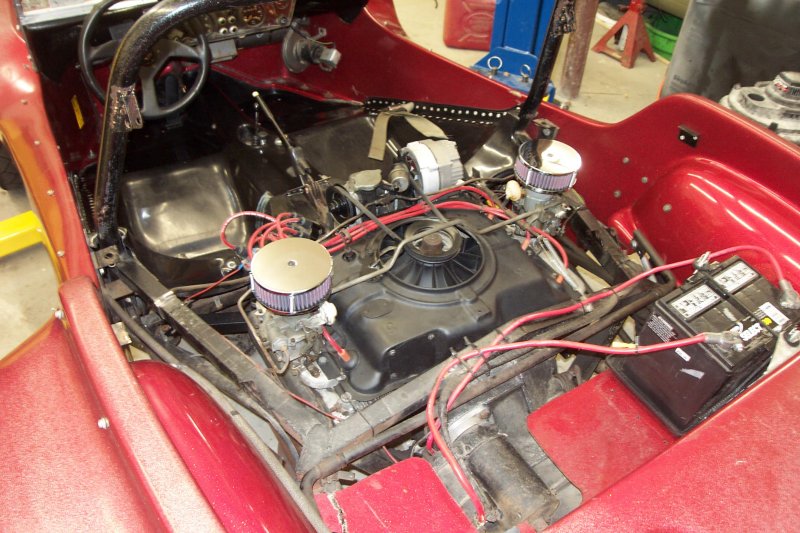
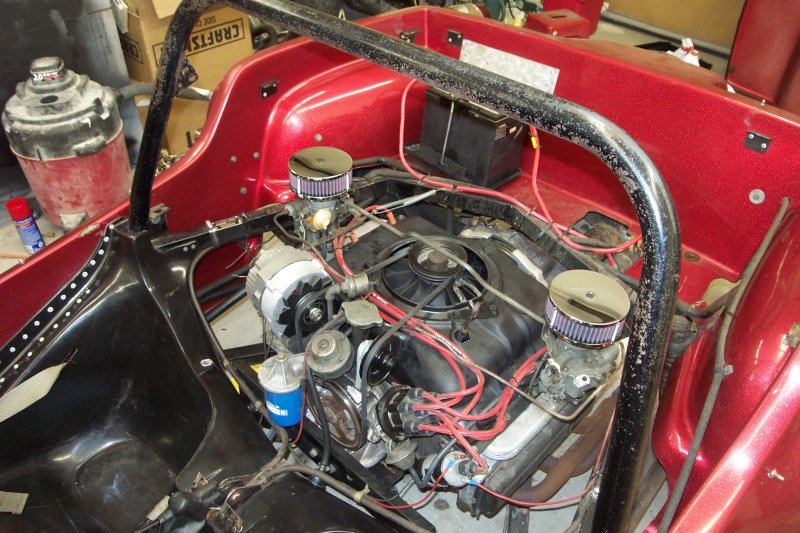
The car is totally original to how it was built, The engine is a 63 two carb Corvair 102hp engine. It was rebuilt at the time of the car's construction (between 69 - 70). It has cyclone headers and dual exhaust with cherry bombs. The ran really ran well for a 32 year old car, especially compared to the turbo engine in my manx. Although I had only driven it around the block a few times. The transaxle is a 67 swing axle with crown berillyum washers (for strength I assume) and the front beam is ball joint with a crown quick steering adapter (about 1.5 turns lock to lock). Drum brakes all around (wide 5). Since the motor runs well and only has 4k miles on it, my initial plans were to put aside the turbo motor from my manx and rebuild it later. I was thinking of the e flow exhaust housing and maybe a weber carb.
The paper work included with the car had some really cool info. Here are some of the specs as presented by Specialty Cars, who built the cars.Front: stock 1/8 in
rear: slight toe out
F 20-24 psi
Rear: 24-38 psi
Keep in mind that these cars were originally fabricated by a race car manufacturer and racers expect to replace all of the moving parts frequently. The cars were never intended for real long-term street use and have to be modified to survive very long. As the parts started to wear, the shift action became much less predictable. The ultimate solution seems to be to replace the whole linkage with a better design and better workmanship.

These two get around the weakness of the VW shift housing.
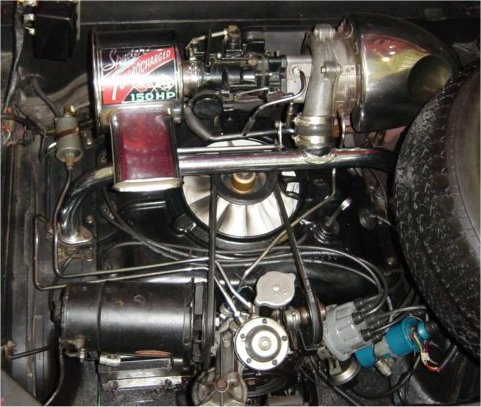
The Corvair turbo was the most powerful stock engine @ 150 or 180 hp
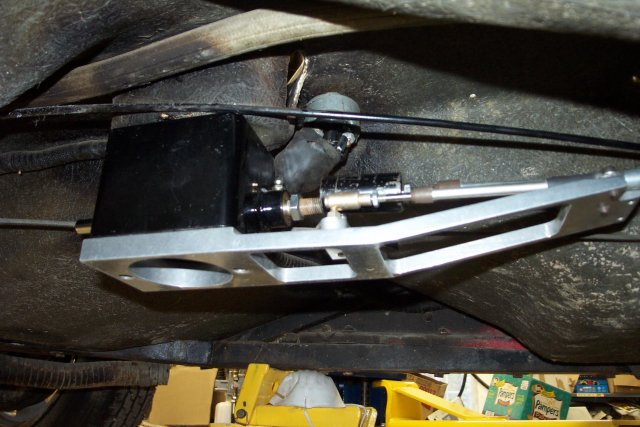
The assembled Jamar Shifter and Denunzio cable adapter mounted the GS's floor
The webers really wakeup the Corvair engine. The only downside is that they project through the Deserter's deck. I had problems with water getting into the cylinders when it sat out for any time. The IECO 4 barrel set up had some problems. However, I think it would make a good basis for a TPI injection system and it fits under the Deserter deck. The valve covers and oil pan and oil pickup are also a lot. Very trick. One of the valve covers has an aluminum "bung" welded on to accept a hose that runs to an auxillery oil breather. If you have a high reving engine you really need this extra crank case vent. Again, a lot. The pistons, cam, adaptor plate, starter, etc are the sort of things I would sell individually or as a lot.
Dave's Small Bodied HEIs is a good source for a distributor. He is a interesting person. He will convert your points distributor to HEI or set it up for an MSD box. Good stuff. His literature talks about a 60/61 distributor. Check with him to see if it will work in a later engine. http://www.davessmallbodyheis.com/
So after finding the deal of the century, I abandoned the complicated turbo idea and decided to build up this parts stash into a killer engine. I already had a few 164 CID Corvair engine cores.
I decided to think about what I realisticly wanted to do to the GS. I would keep the current engine while I got all the bugs worked out. Since I had almost everything to build a 200+ hp Corvair, the weber headed engine would be built up over time. I wanted to have someone reputable do the head work with angle port exhaust, new seats and maybe some porting. No more turbo. Plus, it would look like a mini Can-Am engine!
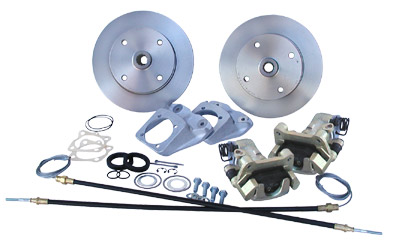
I convinced myself that I will use the Karmann Ghia front disk and CB performance rear setup. I'd like to have an adjustable dual master cylinder pedal system to correct for the change in weight distribution, but will start with the type1 dual circuit master cylinder. This system should be more than adequate even lapping the race track because the car weighs so little. Its basicly the brakes from a Porsche 914 and they weigh about 2000 pounds. Mine should weigh in under 1200 pounds with Fuchs wheels and a some extra reinforcement, but this is still 7 or 800 pounds less than the donor car. I decided that what I wanted to use the car for was autocrossing, some HPDEs and some short distance street driving. I want to build a balanced package for that purpose.
I decided to keep the swing axle as it would be too much work to re engineer the suspension. It seemed to work fine on a Formula vee.
After receiving all the parts, Steve Hansen has this advice about building the "ultimate" Corvair engine from his old parts:
The oil pump I sent you has the longer "409" gears. There is a spacer plate that makes up the difference. You will note two small holes in the plate. You will need to get a drill that fits (matches) this hole and two small roll pins. To assemble put one layer of common making tape around two thirds of each gear. Put the gears in the block. The masking tape sets the clearance. Put the spacer in place and secure it with the included machine screws. Drill through the holes in the spacer plate and into the case so that the roll pins will have adequate depth. Disassemble and clean up the chips. The pump originally went together with two thin gaskets. A rebuild kit will only have one. You can make one or use gasket in a tube. The trick here is end play. If you have to much you will lose pressure. To little and the gears will run hard on the case and end plate. Don't have a spec for you but I think it would be better tight than loose. When you have it together spin it by hand with a long screwdriver. If it feels to tight cut a slightly thicker gasket.
When you start the build up, pick the core engine with the least wear in the cylinders. Most likely it will have the best crank and tightest valve guides.
Run the Otto Parts oil pan, pickup, and valve covers. Also, run the 140 oil cooler I sent you and the 409 oil pump. Use the adaptor, flywheel and clutch that came with the car.
Your current engine will allow you to work out any bugs and give you a summer or two of driving enjoyment. It will also allow you to prototype your remote oil cooler set up before build the big engine. Initially, I would plug the vent hole in the Otto Parts valve cover. But at some point I would locate the vent "can" and work out the plumbing.
I thought the front end was too tightly sprung. Tended to twist the car instead of giving. Formula Vee cars run one torsion bar and convert the other to a sway bar. This is accomplished by cutting the center out of one of the tubes (here the lock bolt is) and replacing it with a length of clear tube I was going to try that but never got to it. It is also possible to take a couple of leaves out of the torsion bar pack. To do this you have to weld the leaves together at the center and ends, grind so they will fit back in, and then cut. Common modification in the dune buggy days.
Honestly the the DESERTER GS will handle so well that the use of IRS suspension is really not needed unless you just plain talk yourself into it. The bad thing too is that the car can be off the road for a long period of time while some of this fabricating is taking place, both the time of design as well as spending lots of money for the parts and machine work.
On the transaxle front, a Beefed Type 1 transaxle will be required. Modifications will need to be made to accomodate this level of power.
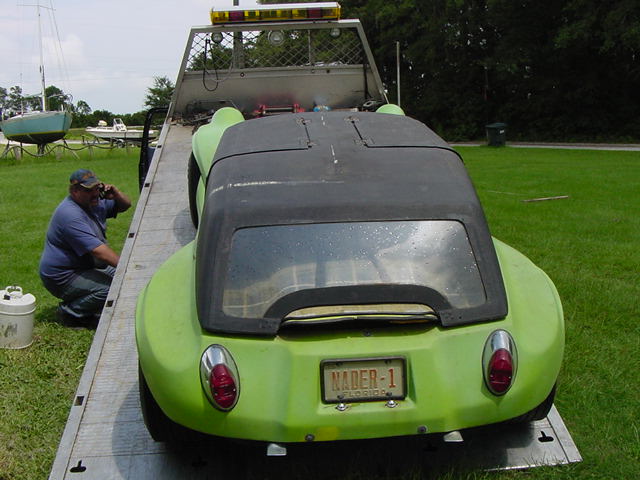
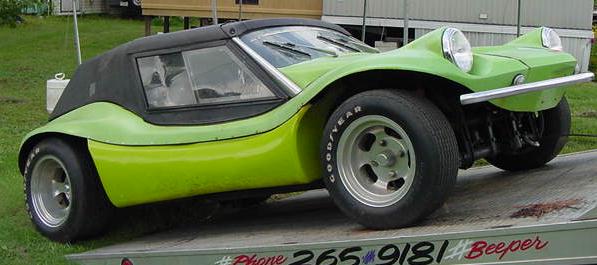
I found David Little who bought the green gs on ebay. This eventually ended up with Mike Guffey in Texas. Here's what avid had to say about his GS/GT:
Mine has had at least 2 other owners. I didn't get much info on it when I got it. Apparently it had been given to the fellow I got it from in Lieu of rent money and not much info was passed along with it. Mine has the 140 HP engine (I have been told), and I have been advised to replace it with a stock 110 HP engine if I have any head problems as replacement heads for the 140 HP are getting very rare. I am hoping all I have to overcome is a stuck valve, but am hearing that they were bad about dropping valve seats in multiple carb setups when the carbs were out of sync. Until I get it out and tore down, I won't know. I have ordered a catalog from a Corvair parts supplier, and I don't plan on tearing it down until I have at least a top end set here to go back up with. Mine has the standard VW shift tube, but the shifter seems to be either shortened or aftermarket. I haven't driven it yet. I will be documenting as much as I can with pictures of the road to recovery.
I gave this advice:
I'm not sure how much you know about the Deserter, but I have been gathering info for a little while. The cars were offered as a kit, complete car for the manufacturer, or built by a dealer. I live in Massachusetts, near the original site that the factory was in. I was lucky to get all the original paper workwith my car and It was built by Specialty Cars in New york, who was a dealer. The papers show the car ordered in late 69, but not delivered until mid 1970. My car has the early body, which I haven't seen many of. I have emailed a few past and present deserter owners and your body style seems to be more prevalent. I think there were only 100 to 150 GS built, so they are pretty hard to come by. Alex Dearborn, who built the original cars, runs www.deserter.com. I think this site, despite having some info, is not so helpful. I sent him my registration information, but he only sends out a hard copy newsletter once a year. I have been told, that he is not very free with his info, but is happy to take yours. I wish there were an online msg forum there of some type. Most of my answers from him seem to revolve on my buying his book, which I received with the car. I do have most of the old brochures,articles, etc anyway. The Corvair 140 is probably the best engine for the deserter. I have heard about dropped seats, but I think you made out, even if you treat it as a builder. I am not a Corvair expert, but I recommend Clark's corvair as well as Corvair underground for parts. Both have been very helpful to me. Clarks has lots of performance and VW transplant stuff which is good. Another good source is the yahoo group fastvair. All high performance stuff for Corvairs. My car currently has the 102hp engine, but I have a another hi-po Corvair engine that I will be rebuilding for the GS eventually.
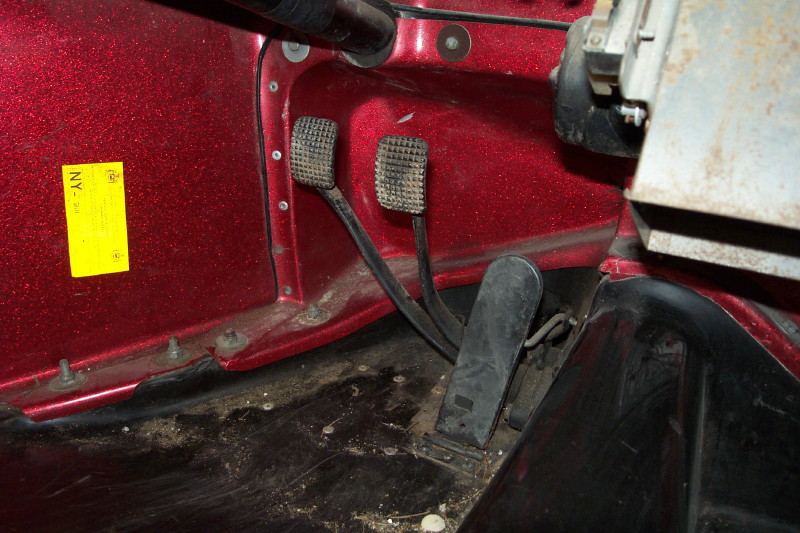
I was considering dual master cylinders or an aftermarket pedal cluster but space is very tight in the foot box.
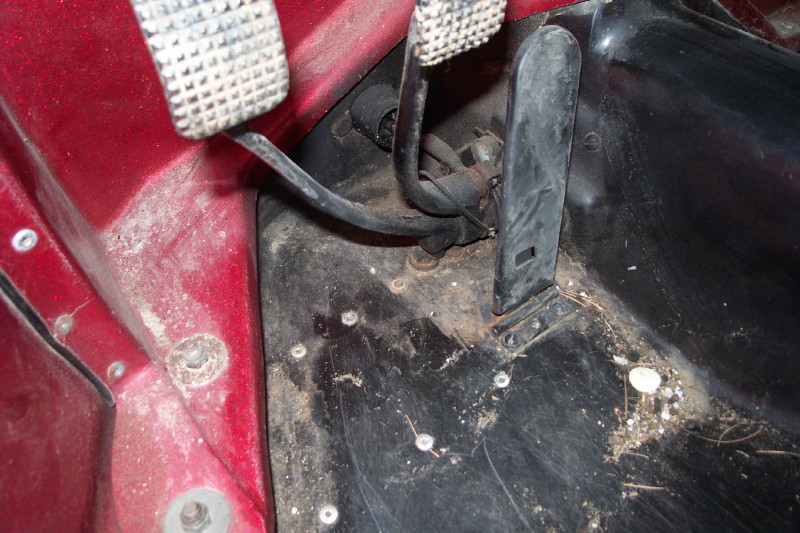
Willwood, CNC and Neal Products make aftermarket pedal assemblies. Having a balance bar would make it easy to adjust the brake proportioning. When my car was assembled, a 1/8" steel sheet was riveted to the bottom of the frame. This reinforces the pedal assembly where it attaches to the fiberglass floor pan. Other owners commented on being able to watch the pan flex as the clutch pedal is pushed in. A even better method would be to have mounted the pedals on a steel tube subframe and used a much thinner and lighter floor pan.
I would like to add real 5 point harnesses. Mounting the anti submarine belt is a problem. I would like to weld a crosswise tube between the lower frame tubes to attach the belt anchors to. This would also create a more rigid mount for the shifter. I would have to cut slots through the fiberglass seat pan large enough for the belt fittings to pass through. At that point I would make an aluminum under tray to seal off the bottom of the car. This could also aid in directing air into the engine compartment from under the car.
I'd also like to convert to a hydraulic clutch. I've been told to periodicly check every part of the clutch linkage. Stories of broken the pedals, pedal brackets and the throw-out bearing arm inside the transaxle. The cable is also prone to stretching and will need periodic adjustment. I imagine that you could convert to a cable in a housing and localize the stress and reduce the movement, but I don't think the open cable will ever work very well. Plus, it passes thru a hole in the front motor mount that doesn't need to be there.
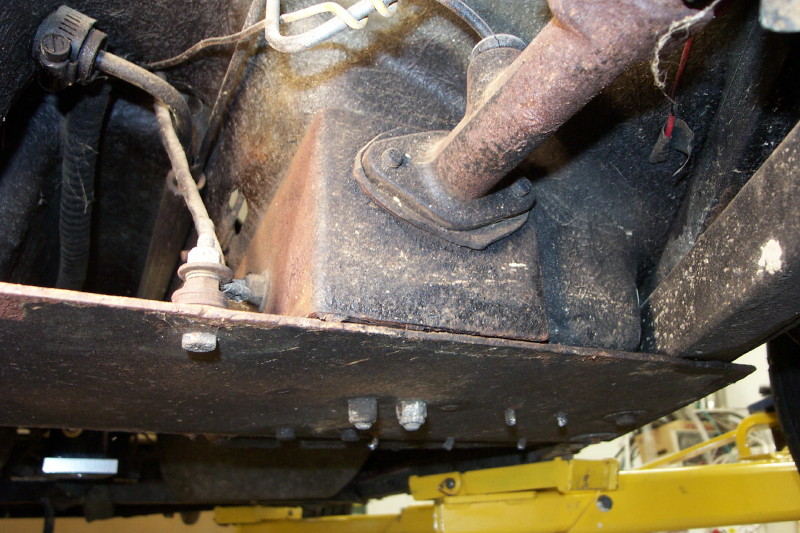
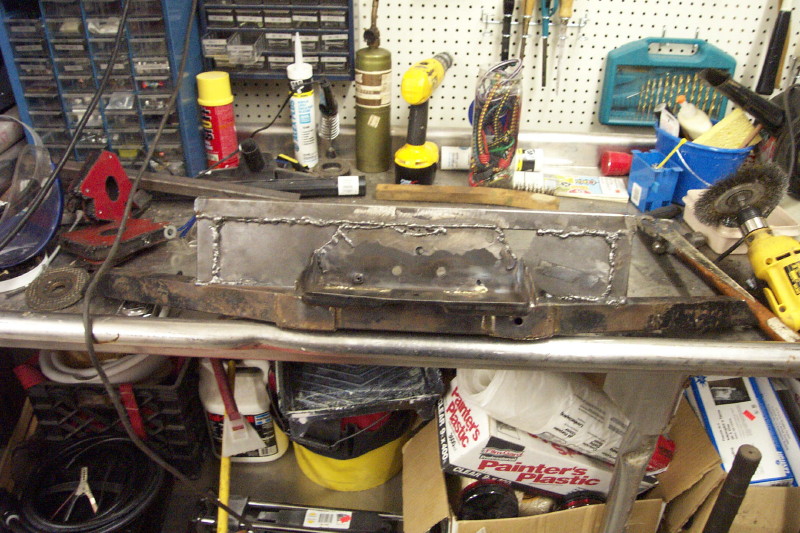
Part of my shifter tuning problems was the fact that when the clutch was in, the entire drivetrain would move forward an inch or so, changing the effective length of the shift cables. I took the the engine cover off and pushed in the clutch pedal while I sat in the car. I had an assistant watch and the whole engine and transaxle would move forward from the pull of the clutch cable. Here's how I reinforced my front engine mount:
I made this one of 1/8" plate for the bolt pattern and 1" square tubing for the rest. I also brazed the cracks, and added additional braces from the top of the center flange to the tubes at least a foot away from the flange.
I have all the parts to run the hydraulic clutch with a stock pedal assembly. I would like to go with aftermarket pedal, but that will have to wait.
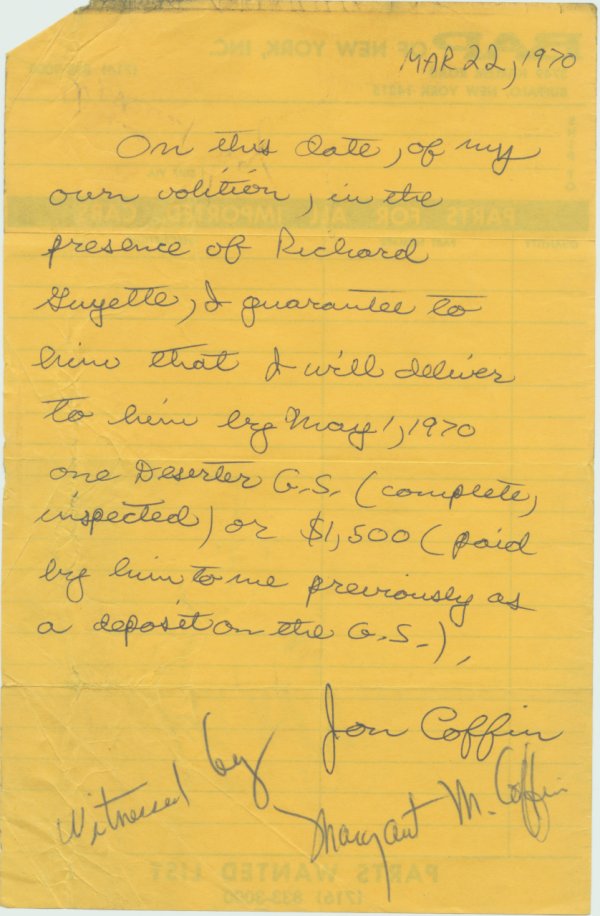
I was able to track down the son of the original owner about my GS!:
"my dad built back in '68 or so!
Looks like you have done some nice work on it so far - I like the cable shifter.
History - Dad bought it in either '67 or '68 - instead of a Lotus 7 (bad move) because it was faster in an auto-x. Had it built by a guy in upstate NY who was the local AutoDynamics dealer (John Coffin) and helped him on weekends. If you look at the plate on the frame (behind the driver I think) you'll see the serial number which ends in 007 as I recall. My dad thinks that means that it was the 7th (or whatever # it is) car produced but he could never get Alex Dearborn to fess up.
He raced the car in regional events in NY from '68 thru about '74. I actually remember being at one race and I was born in '71 so that must have been about the last one. He took a lot of 3rds in AM because at the time there were two very active Formula fords running AM (now run CM) that he could not beat.
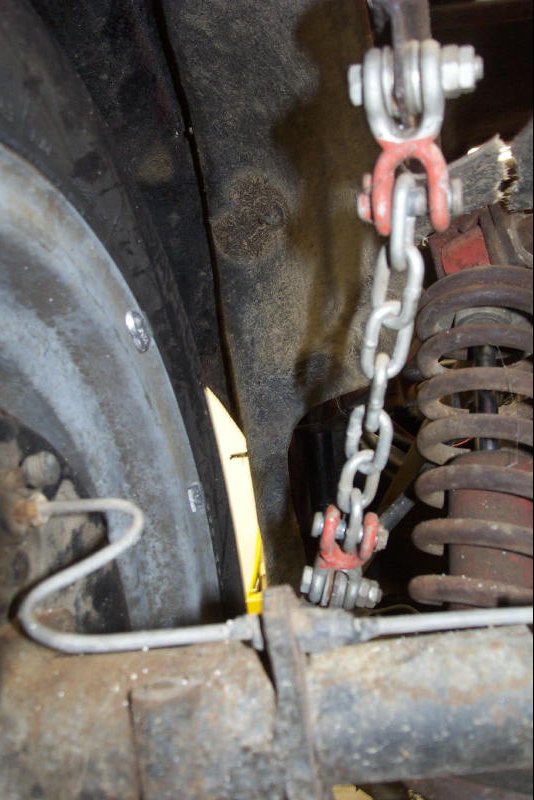
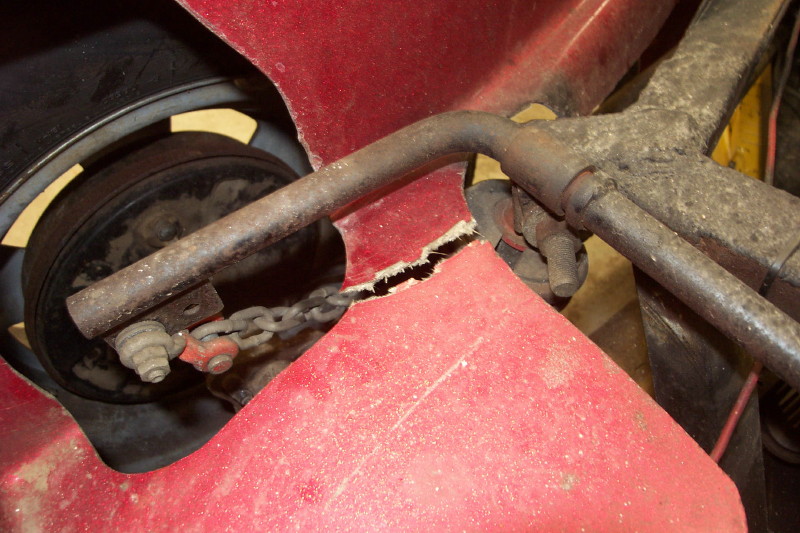
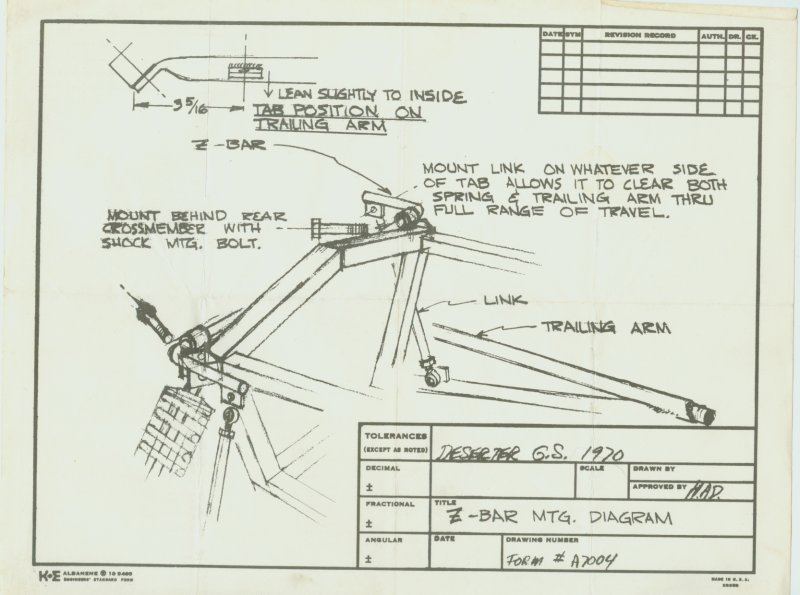
(BTW - the Z-bar used to have downlinks. At some point early on - I think on the road - one of the Z-bar mounts broke. Dad and Coffin surmised that the downlinks were a bad idea so they re-welded the mount (which you can see) and took them off replacing them with chains. This was incorrect. The problem was that the Z-bar was set up too stiffly - or is too stiff. A Z-bar is part anti-sway bar part the opposite of an anti-sway bar. When you go into bump on one side of the rear the Z-bar pushes the other side down - the opposite of a sway-bar. (This movement has near zero resistance to roll - thus it is approaching a 'Zero-Roll' setup. A sway bar's sole mission in life is to resist roll by forcing the inside wheel to mimic the movement of the outside wheel. The established setup for VW type 1 suspension is zero-roll in the rear and a swaybar in the front which controls all vehicle roll resistance) When you go into bump on both rear wheels the Z-bar resists both actions similar to the way an anti-sway bar resists the bump of one wheel. So like an anti-sway bar it can be setup softer/harder depending on where the downlinks are placed and also using a smaller bar makes the effect softer. My guess is that he hit a big bump in the road, both rears went into bump, and rather than the Z-bar giving to allow the movement it held and one of the mounts was overpowered and broke. The chain will help with droop to a certain extent but it is currently way too loose.
On the track you want typically no more than 0 degrees of total droop (total droop = the camber of both wheels added together when the wheels are unloaded - the rear camber of swing axle cars is always measured as a 'total' number since there is no roll resistance) - or the axles should never tilt below horizontal. Most cars actually run more like neg 1-2 degrees of total droop in the rear but that might be too much to ask from a car that also drives on the street on street tires.
After that he kept the car registered up until '78 and drove it rarely on the street - he used to take me in rides when I was pretty little. I remember it being so windy that I could barely open my eyes. The car was always garaged until we moved to California in '82. It sat outside in Ca under a tarp from '82 until '90 when my family moved back to NY. At some point the tarp ripped and that is why there is sun damage on the front and fender of the fiber glass. I started the car a few times in the late '80's but it never saw the street.
I pulled the car out in '92 or so and started tinkering with it. Got it running, replaced a couple of wheel cyls, rebuilt the carbs etc. I registered it at some point - maybe '95 and drove it on the street a bit. Had to get that exhaust made to sticker it - the thing came out ok but it could have been done better. I even drove it from Portsmouth up to OOB once on rt 95. I also used to drive it on short trips to work etc during good weather. I probably put the last 200-300 miles on it ( it had 3700 when I started). I used it for one auto X and one auto X school. At the school I was pitted next to a guy with a D-13 FV (same as the one I have now) and I really liked the FV. I met a guy there - name escapes me at the moment -
who was the NER Competition Board Chair. He and I talked about my car and about the FV. He was really interested in the GS so he called me a couple of months later with an offer to trade the GS for a D-13. By that time it was pretty apparent that auto X ing the GS was not going to be a winning proposition and it was going to be expensive so I went for the trade.
I know that he had been trying to sell it after a while bec. he had too many projects going on but I didn't hear from him after he picked it up.
For autoX you might also check out the SCCANH - they run very low key events where you get a lot of seat time - plus there won't be any AM's there. Typically they run at NHIS. Also - that fame FV (also a D-13 which is made by Autodynamics) belongs to John McDonald who took 3rd in FM at the national championships this year - and he has fixed his selector problem now.
You may actually not have to worry too much about your selector if you run mostly at NHIS. The surface is small enough that you can run the whole thing in 2nd - especially if you can get up to 60 with your size tires. I used to launch in 2nd too, there is plenty of torque to handle it - I do the same thing in the solo vee which has only about 85 hp but I can still spin
the 9" slicks!
That car runs in A-modified for solo II - unfortunately. You can try talking to people at the NER about putting you in a different class - maybe DM or something like that but I'd be surprised if they go for it. Bill Goodale won several national championships in a GS a long time ago, he is still active in the NER but runs a yellow AM now called the Dragon F1 - the
thing has huge wings, a supercharged Kawasaki and is crazy fast. He is restoring his old GS and might be a source of some info on it. You can also try his buddy Bill Gendron who owns Small Fortune Racing in Moson, MA. He is also very active in the NER and has won a couple of BM national championships.
You will find that the car has a few problems that are fixable.
1) Rear Suspension - mucho mucho loose best describes the way the car drives. I never spun it but I came close at practically every corner. The reason is that the chains on the Z-bar (it is not an anti-sway bar, a Z-bar actually allows roll rather than fights it - it is an early evolution of something now called Zero-Roll resistance suspension.) do nothing for you.
That was a mistake that my dad made a long time ago and I did not realize it until after I sold the car. Look for info on how to set up a Z-Bar formula vee - that is what you need to do. Namely the chains need to be replaced with solid downlinks and heimi joints to the axles to limit droop and control the axles during chassis roll. The Z-bar may be too stiff as well -
you can go with a narrower one or move the downlinks to the ends of the Z to soften them - similar to an anti-sway bar in that respect.
2) Traction - the car needs racing tires. You cant get 15" or 14" 25R compound tires from Hoosier - they only come in 13". You can get custom wheels from diamondracingwheels.com or from kaizer to fit the vw pattern. Or you can get harder compound road-race tires in the larger sizes - up to you. My dad used to run road racing rain tires because they have a softer compound and you can get by with them on the street with no one noticing :).
3) Shifting - the 2-3 downshift is nearly impossible on FV's or in the GS but maybe the shifter kit will help. You just have to play with it to get it to work. 2nd is too short for running at Devens but 3rd is pretty tall for pulling out of corners. I run Devens in all 3rd gear in my solo vee but my car weighs about 300lbs less and I carry much more speed thru the corners
that you could in the GS.
4) Brakes - FV's use a 2 master cyl setup which would work better on the GS too. It gives you more line pressure and a built in way to change the front-rear balance. Bad news is you have to buy a new pedal assembly and install it - or fabricate one. You can see an example made by Girling on the racerpartswholesale.com site ($250 incl pedal, M/C's and balance bar) and check out the vector FV site - they have some pics of their pedal setup. The brakes as is are OK for VW brakes especially if you run on street tires. I locked the fronts several times so they were getting enough stopping power. When you put slicks on though your grip will increase by 30% and the brakes will probably not get the job done anymore.
In general I'd highly suggest you read as much on FV as possible. The GS is basically an Autodynamics MK IV FV that has been widened for two seats and the bigger engine. Pretty much everything else is FV except the ball-joint beam. Not sure where you saw my post but if you have not checked out http://formulavee.proboards2.com I'd suggest it - lots and lots of great
info there.
Good luck and let me know if you have any questions - I'd be happy to fill in some blanks for you. The car is a lot of fun to race even if it is not all that fast. You barrel into corners, the rear end starts to drift, you mash the pedal and steer thru the wheelspin with the throttle. Not a delicately balanced car but lots of fun - kinda like auto xing the dukes of hazzard. I'm sure that you can improve that a lot though with the right tweaks.
This email filled in some blanks and was very helpful. It also explained why My Z-Bar wouldn't work with the Previous owner's Chain end links. That was my next project.
|
|
|
You can read about my first Autocross adventure here: Autocross 1 report
After the first Autox, I had a few things to address. On the bright side, the cable shifter finally solved all my shifting woes. I was pretty nervous about the tow bar, but it worked perfectly and I had no problems.
The autocross brought up these issues.
1. Fan belt slippage! When I took it out friday night test ride, it was squeeling on down shifts, so I should have checked it. I did notice that the belt "fipped" and was pretty much round shape by the time it broke.
2. Look into a rev limiter of some kind. It's practically impossible to see the tach in it's current position, and I worried about an over rev.
3. Look at replacing the chain links on my zbar. I need to get some real end links so that the zbar does it's job and doesn't make it so twitchy under trail braking. With the chain, it works as a roll bar, not as it's intended. That was the cause of my spin on my first run.
4. Install better seat belts. Lap Belt only not cutting it for me
5. Bring Rain Gear!
The purpose of the Z-bar is to limit changes in ride height which lead to changes in rear wheel camber. This is the opposite of an anti-sway bar which is intended to limit roll. More camber means less of the tire is touching the ground. This is bad for cornering, but raising the center of gravity is worse. The chains mean that you can limit droop (wheels hanging down) but not squat (wheels up into the car). Both are bad and should be limited.
There are 2 adjustments available with the original design. The position of the slider along the Z-bar determines the leverage and hence the force available. The other adjustment is the length of the links.
I had replacements made by Jim Wolcott of Vintage VW. I had him take some hexagonal aluminum rod and tap the ends with left and right handed threads. I made 3 different lengths to test with. I modified the links so that I have some adjustment using the right and left handed threads of the rod-ends. I use this for fine tuning different tire combinations.
I now have mine set so that the swing axles just droop about 1 degree past horizontal. I set the suspension with the car ballasted with my weight in the driver's seat. I adjust for equal ride height side to side using the rear coil-over spring collars. I set the ride height to give 1 1/2 or 2 degrees negative camber. Lower is better as long as it isn't bottoming. The rear is a little low so I need to adjust the front torsion bar pivot adjuster to set the car level. I'm looking into extended range front camber adjustment pivot blocks so that I can run about 1 degree negative camber in front.
After running my second Autocorss there were additional issues. Before I ran autox #2, I made these changes:
A test-drive showed increased power everywhere in the rev range. I
was quite happy. The only thing weird was the timing. Initially
after adding the pertronix the car would not start. I gave the
distributor a twist and got it running. Pretty well, I'm might ad.
I check it with a timing light at it showed 32 deg! It must have been off
because I road tested it and there was no pinging at all and it had a
smooth idle. I was concerned that my balancer have shifted or my timing marks were off.
The car ran really well with the work I did to it, it was very
torquey in the mid range, and really tapering off over 5k, but I assumed that it is normal for a 102 with headers and dual exhaust. It was
a lot hotter in the afternoon and I eventually whittled my time down
to the 49 sec bracket. Miatas with R compounds were running around
the same time, but FTD was around a 45 and that was with prepared
cars. Giving the tightness of the course and my troubles at the
hairpin, I could have easy picked up 2 sec. I'm also a newbie, this
is only my third autocross ever. In the afternoon, after my day's
six runs, I did 3 fun runs. The first one I took a passenger and did
another 49 (tried an ebrake yank at the hairpin). The second run I
ran again pretty quickly at first and then the car went flat again
in the middle of the rev range. It was so bad, that I did the entire
run flatout and pulled a 52. I let it sit for a while, and after a
thorough inspection I could not find anything obvious wrong with it.
So after riding with someone for two runs twice, I made one final
run. Same thing, flat power everywhere. No evidence of belt slip.
I did find the source of the smoke I saw at the last event. Nothing
to do with the belt, It was a small oil leak on the headers. That'll
be easy to fix. All in all it was a successful event, but I needed to address out the loss of power. I do not
have a cht gauge, but my oil temp never went over 200.
Adding the real endlinks to the zabr seemed to help under braking,
but the added power made the car a handful on this tight course. I was
looking forward to the fast course in two weeks at ft devens.
I also wanted to try adjusting the brakes carefully before the next
event. I found that in my Miata ride along he was killing me under
barking, I wanted to try and get some of the travel out of my pedal.
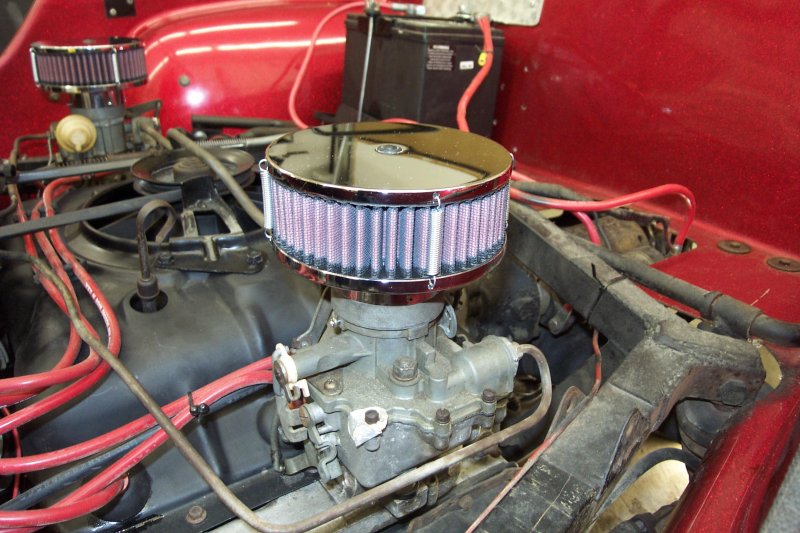
After Event 2 I tried to put some miles on the car to debug further. Since I had made the ignition changes to the car, it had been running great and I put about 100 miles on it during the week and there were no issues. I also installed new air cleaners with K&N filters. These replaced the dirty old paper ones that were on there. Looked better IMHO. The K&N air cleaners were from a GTO tri power set. I set screwed them to the carb adapters, and plugged the top lid with a grommet and plastic plug. I added the side springs to hold the top and bottom together. It would have been easier if the there was a stud in the carb. I was all proud of how them came out until Autocross 3
What was bothering me was why was the engine flat during the autocross?
I drained the tank, changed the in-carb fuel filters, added an inline filter, added fresh 93 octane and some fuel system cleaner. A quick 10 mile test drive showed no problems. But I was only able to put in 5 gallons before I could see gas at the filler. The filler is at the top of the tank on the passenger's side. I topped it off, but It doesn't look like the tank holds more than 6 gallons. With no gas gauge, I'll put this on my wish list, too.
Autocross 3 went not according to plans... Read about it here: Autocross 3 report
I got some post mortem advice.
Bob Coffin, of the shop gave some advice about my weber motor:
I still didn't know why my 102 siezeed. I never heard any pinging, and it ran great. The car never would rev over 5500, I watched closely during my instructor run. It wasn't THAT hot out, and I never idled for more than a few minutes. I'm currently running the full size magnesium fan.
Everyone I asked felt it dropped a valve seat. With a cam stock grind, I'm probably limited to 5500 rpm or even less. I also could be limited by weak valve springs. The oil temps really werent that hot.
280 degree oil is common. I shouldn't worry until it hits 300. Chevrolet's engine dyno tests with engine room ambients ran the oil temps up to 270-280 degrees. Even the SAE report on the 1960 Corvair showed 280 deg oil at high-speed road-load. Without an external oil cooler those oil temps are not unusual.
To confirm all this I need to inventigate into the motor.
I also leared about Reverse rotation corvairs. I felt this could be an asset to the Weber motor.
I was confused about how all this worked. A stanrdard rear-engine buggy with a corvair needs to have either the transaxle or the engine reversed to correct rotation. So a mid-engine corvair would require no reversing of either the engine or the transaxle. So if reversing the transaxle is hard on the "cut" of the gears, whouldnt a reversed mid engine require a reversed transaxle, which is the weak link in the equation? I must be missing something.
This is difficult to picture in one's mind. Just correcting the wheel rotation by using a stock rotation CORVAIR in a midship with a VW gearbox doesn't do anything good except have the right rotation of the rear wheels. When the CORVAIR engine is reverse rotated it then turns the proper VW way. If that engine is mounted midship then true the wheel rotation would be backward EXCEPT that then the ring gear is flopped to the opposite side of the pinion, THUS correcting the wheel rotation. In this same manner, the reverse turning CORVAIR is now turning the VW gears in the transmission the proper VW way, doesn't make any difference where the engine is mounted, the gears are being turned the VW way. This is the important part, turning the transmission correctly.
Placing the ring gear on the opposite side of the pinion makes no difference to the gears, it will work either way and in fact the early type 2 had the ring gear on the other side anyway because there was a reduction gearbox at the wheels to lower the gear ratio more than what was in the ring and pinion.
This explanation makes sense to me. Initially on this subject I heard warnings about the coast side of the ring gear being weak. From my own experience with my Manx I dismissed it. So what you and Chuck are telling me is that the weakness of the vw transaxle is in running the GEARS backward not the reverse rotation of the ring gear. That makes much more sense to me.
So it seems that the reccomendation is to reverse the "weber motor" and purchase a strong transaxle with a flipped ring gear when the time comes.
Reverse rotation engine needs some parts different that a standard rotation engine.
Copyright © 2005 - Lou Masciarelli
This page last updated 1/30/05
All Rights Reserved
Webmaster: Lou Masciarelli - loumash